
Introduction
What are Materials?
Materials are the surface finishes and textures you apply to 3D objects inside your configurator.
Each material in your library can carry a texture image, physical rendering properties (like roughness and metallic level), a base color, pricing, and availability settings. Once created, materials can be assigned to specific product configurators so your customers see the right options when they customize.
Getting Started
Understanding the Interface
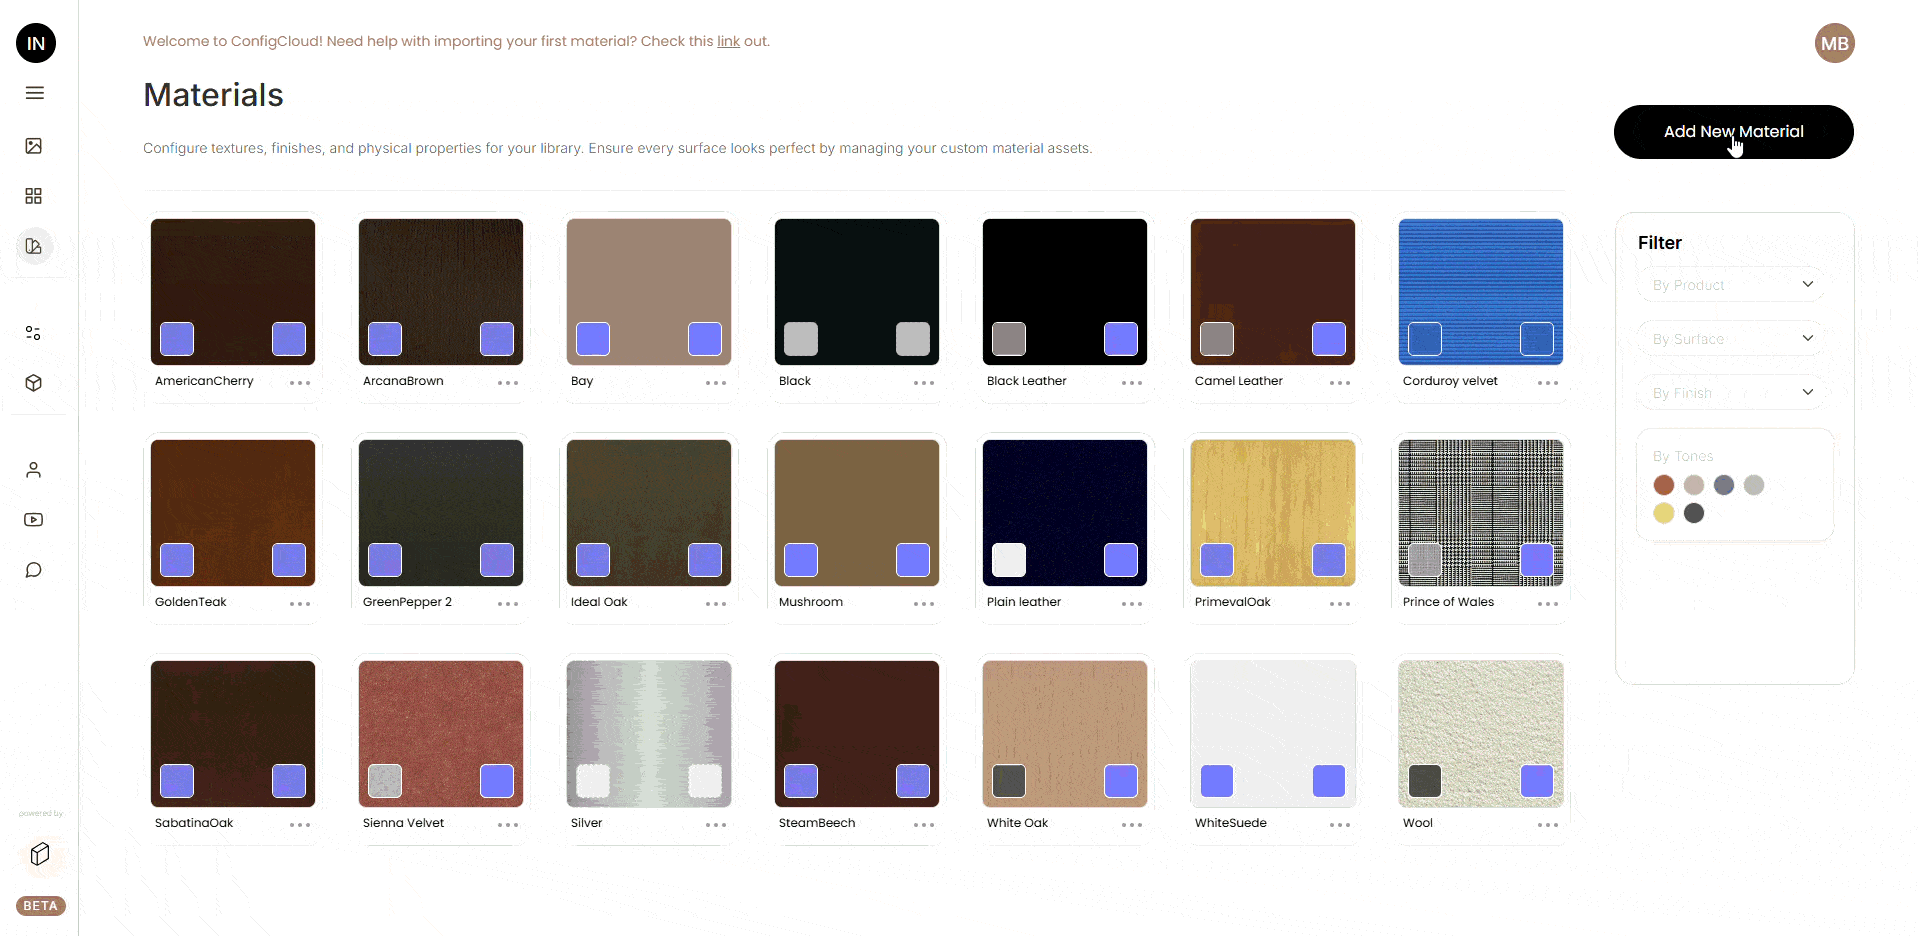
When you open the Materials tab, you will see three main areas:
- Header Section: Shows the page title, a short description, and the "Add New Material" button.
- Materials Grid: Displays all your materials as cards with texture previews.
- Filter Panel: Located on the right side, this lets you narrow down your materials by product, surface type, finish type, and tone color.
Material Cards
Each material in your library is shown as a card. Here is what you will find on each card:
- Main Texture Area: The large section at the top shows the primary texture image of the material. Clicking it opens a full-screen image viewer where you can zoom in, drag around, and inspect the texture closely.
- Roughness and Normal Texture Thumbnails: Two smaller texture previews appear in the corners of the card. These are the technical maps that control how the surface interacts with light. You can click them to view them in full size as well.
- Material Name: Shown at the bottom of the card.
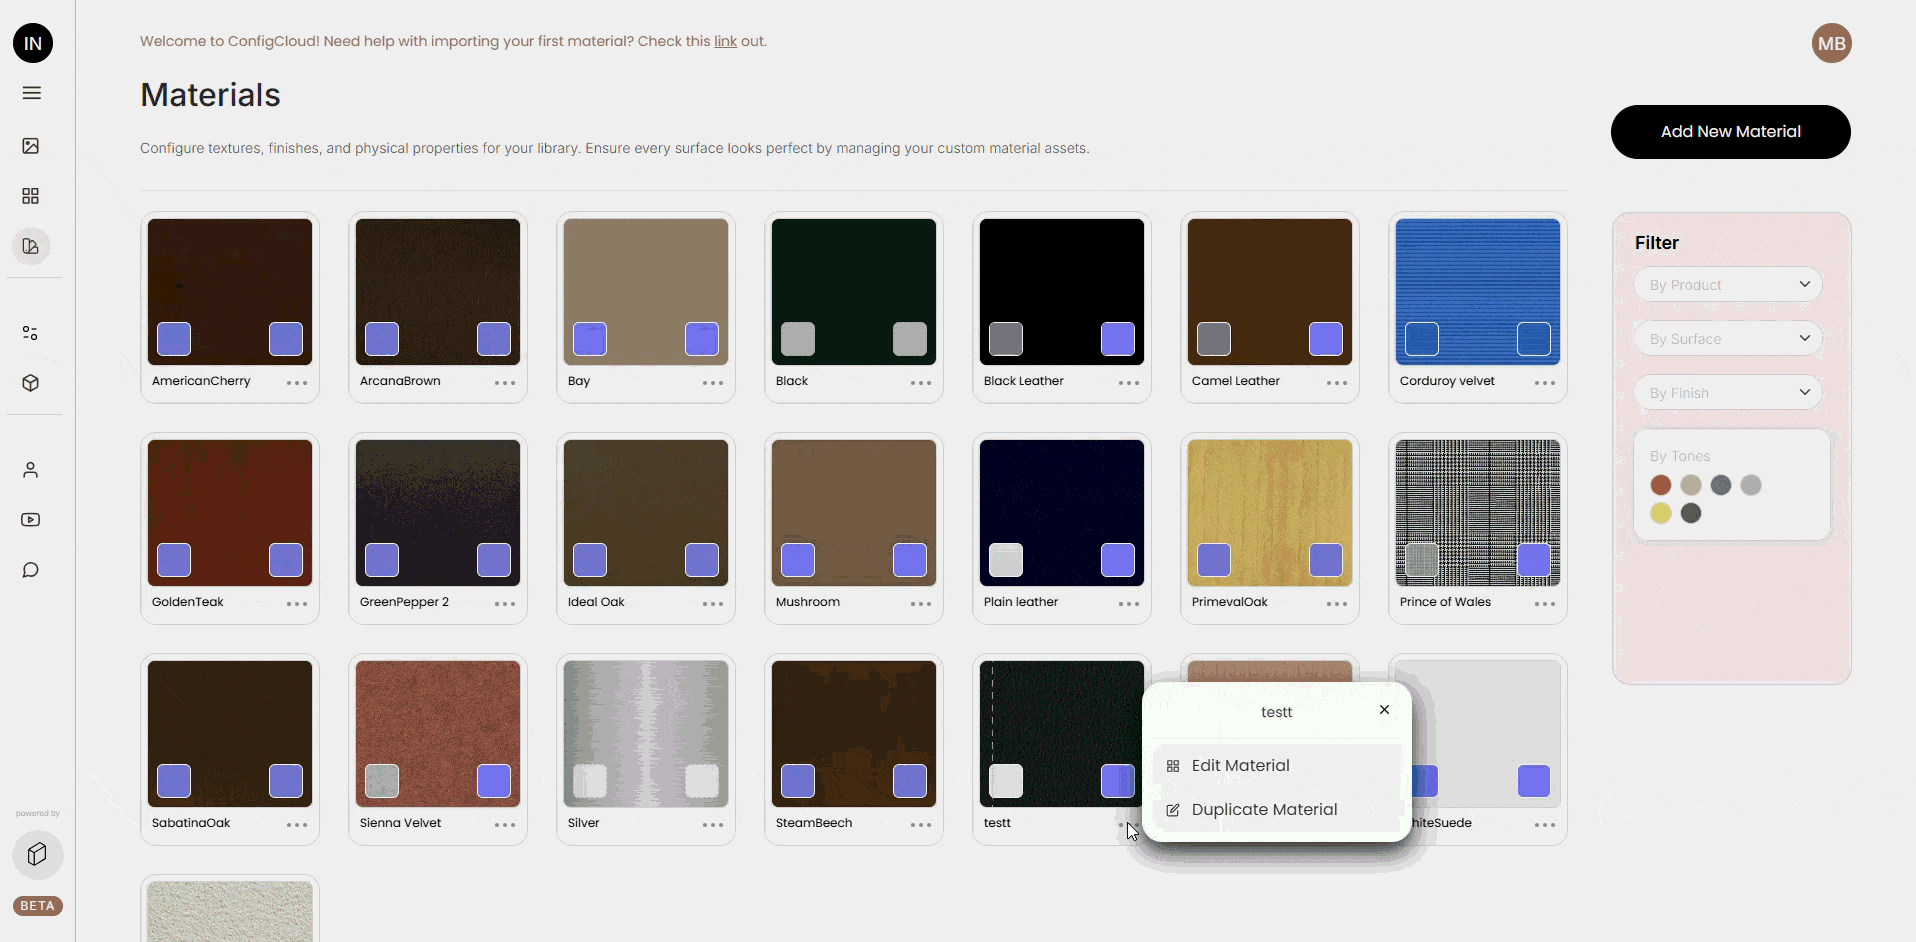
- Three-dot Menu (?): Located at the bottom right. Clicking this opens a small popup with options to Edit or Duplicate the material.

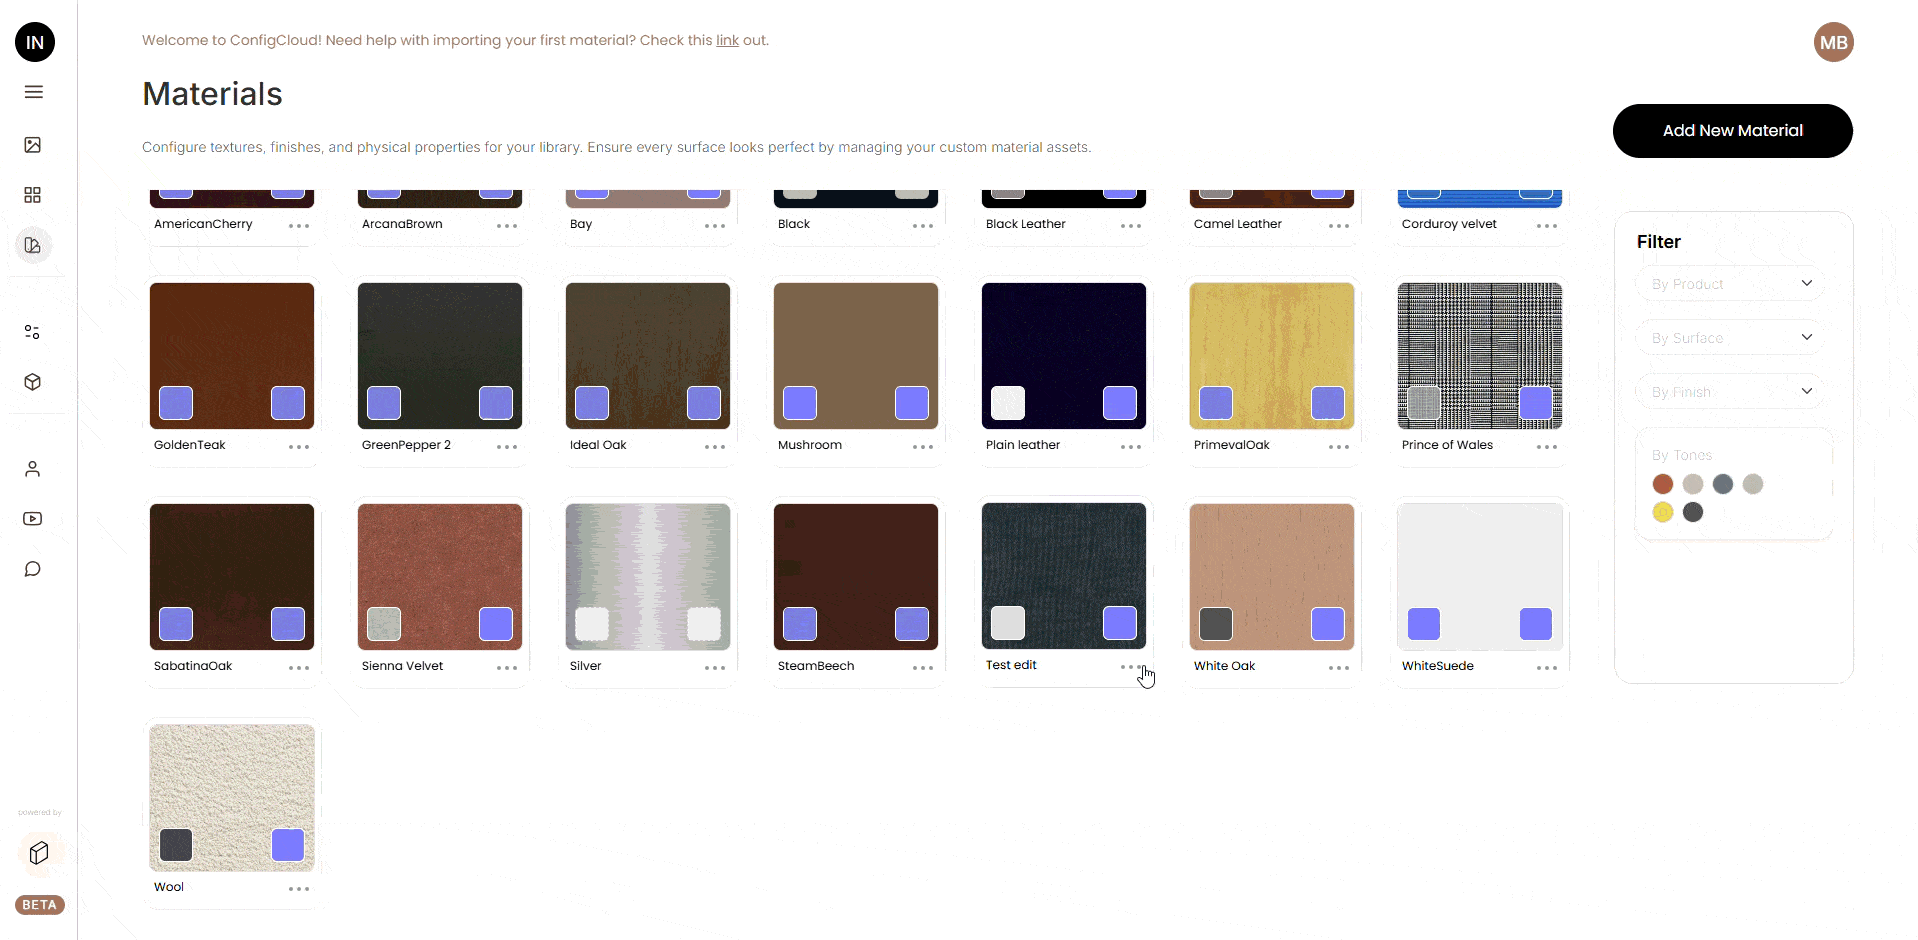
Card States
Active Materials: These appear in full color and are fully interactive. You can click, edit, and duplicate them.
Disabled Materials: These appear grayed out and cannot be interacted with. This happens when you have reached your subscription limit. A message will appear explaining the situation when you try to click a disabled card.
Add New Material
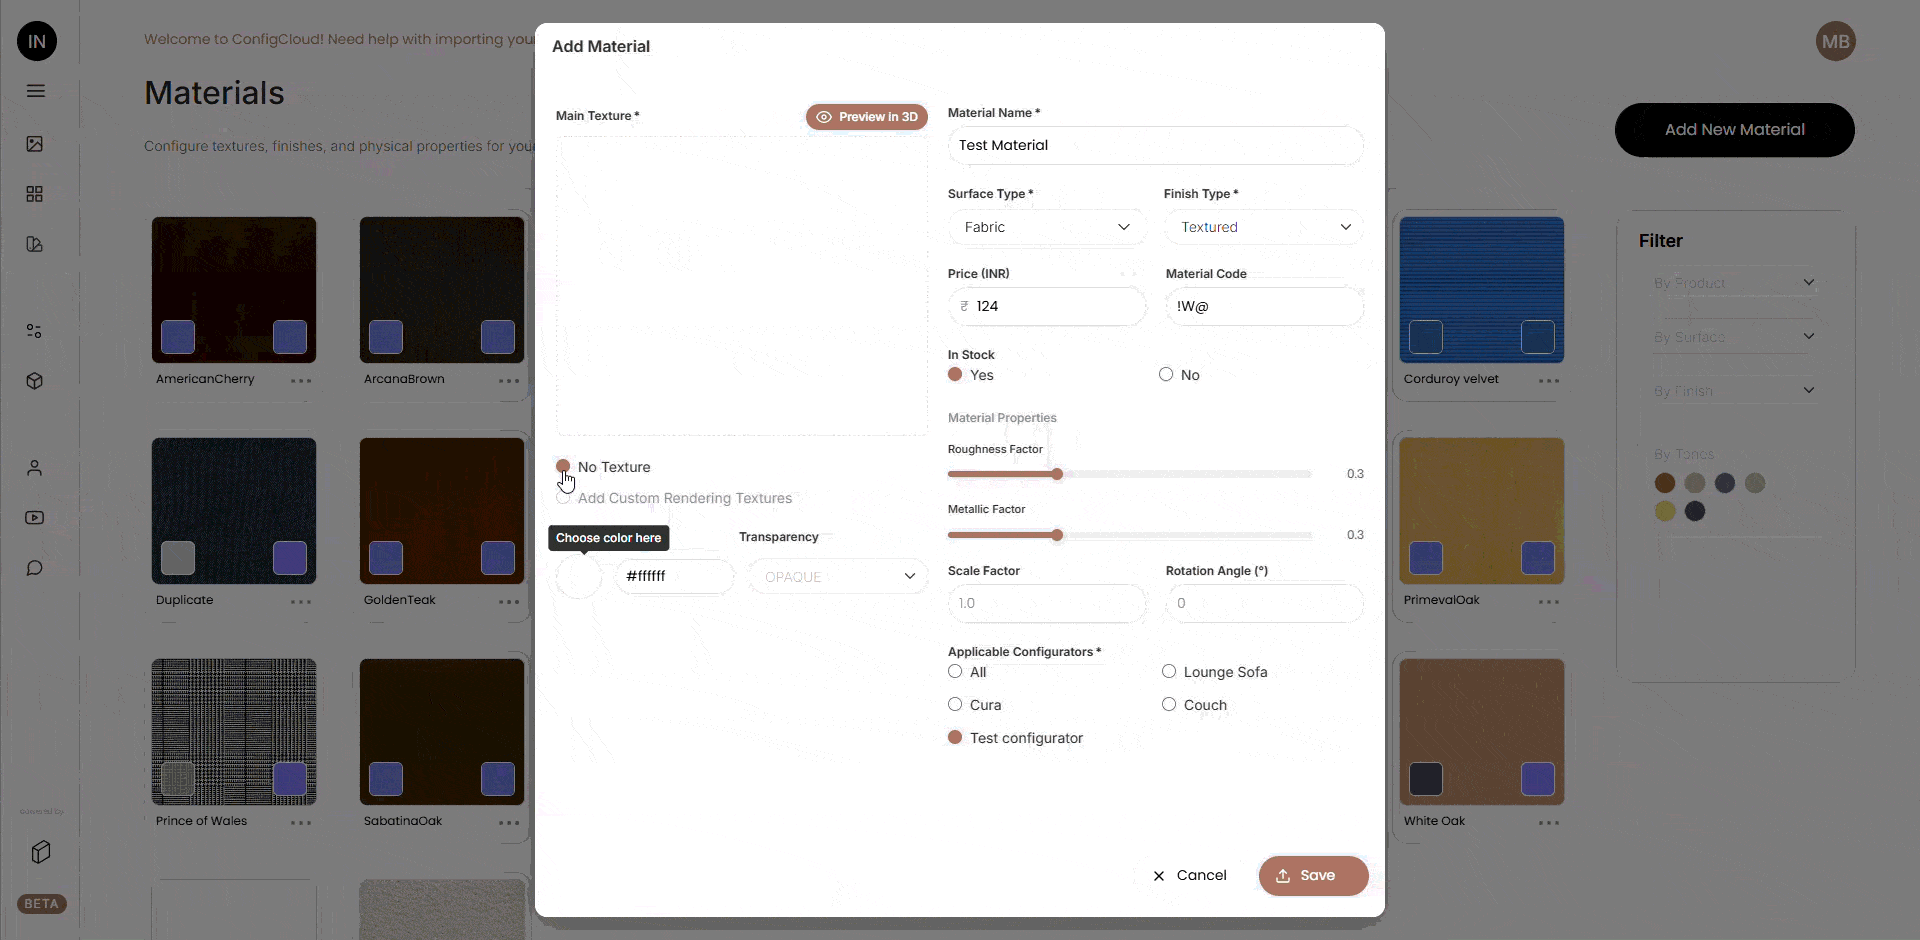
To add a material, click the "Add New Material" button at the top of the page.
A panel will open with all the fields you need to fill in. Here is how to go through it step by step:
Step 1: Upload Your Main Texture
This is the most important image. It is the visible texture of the material — for example, a wood grain photo or a fabric close-up. Click the upload area and choose a JPG or PNG file.
Step 2: Choose a Texture Option
You have two checkboxes below the texture upload area. See Section 10 for full details on how these work.
Step 3: Fill in Material Details
- Material Name (required) — Give your material a unique name.
- Surface Type (required) — Select one or more surface types from the dropdown (for example: Wood, Metal, Glass). You can select "All" to apply it to every surface type.
- Finish Type (required) — Choose a finish from the dropdown list.
- Price — Enter the cost of the material. The currency code and symbol shown (for example INR / ?) are pulled from your account settings automatically.
- Material Code — An optional internal reference code.
- In Stock — Set whether this material is currently available (Yes or No). Materials set to "No" are hidden from customer-facing views.
Step 4: Set Material Properties
Adjust the physical rendering properties using sliders and input fields. See Section 12 for details on each property.
Step 5: Choose Applicable Configurators (required)
At least one configurator must be selected. These are the product configurators where this material will appear.
Step 6: Save
Click the Save button. The system will process your images and save the material. All five mandatory fields are checked at once.
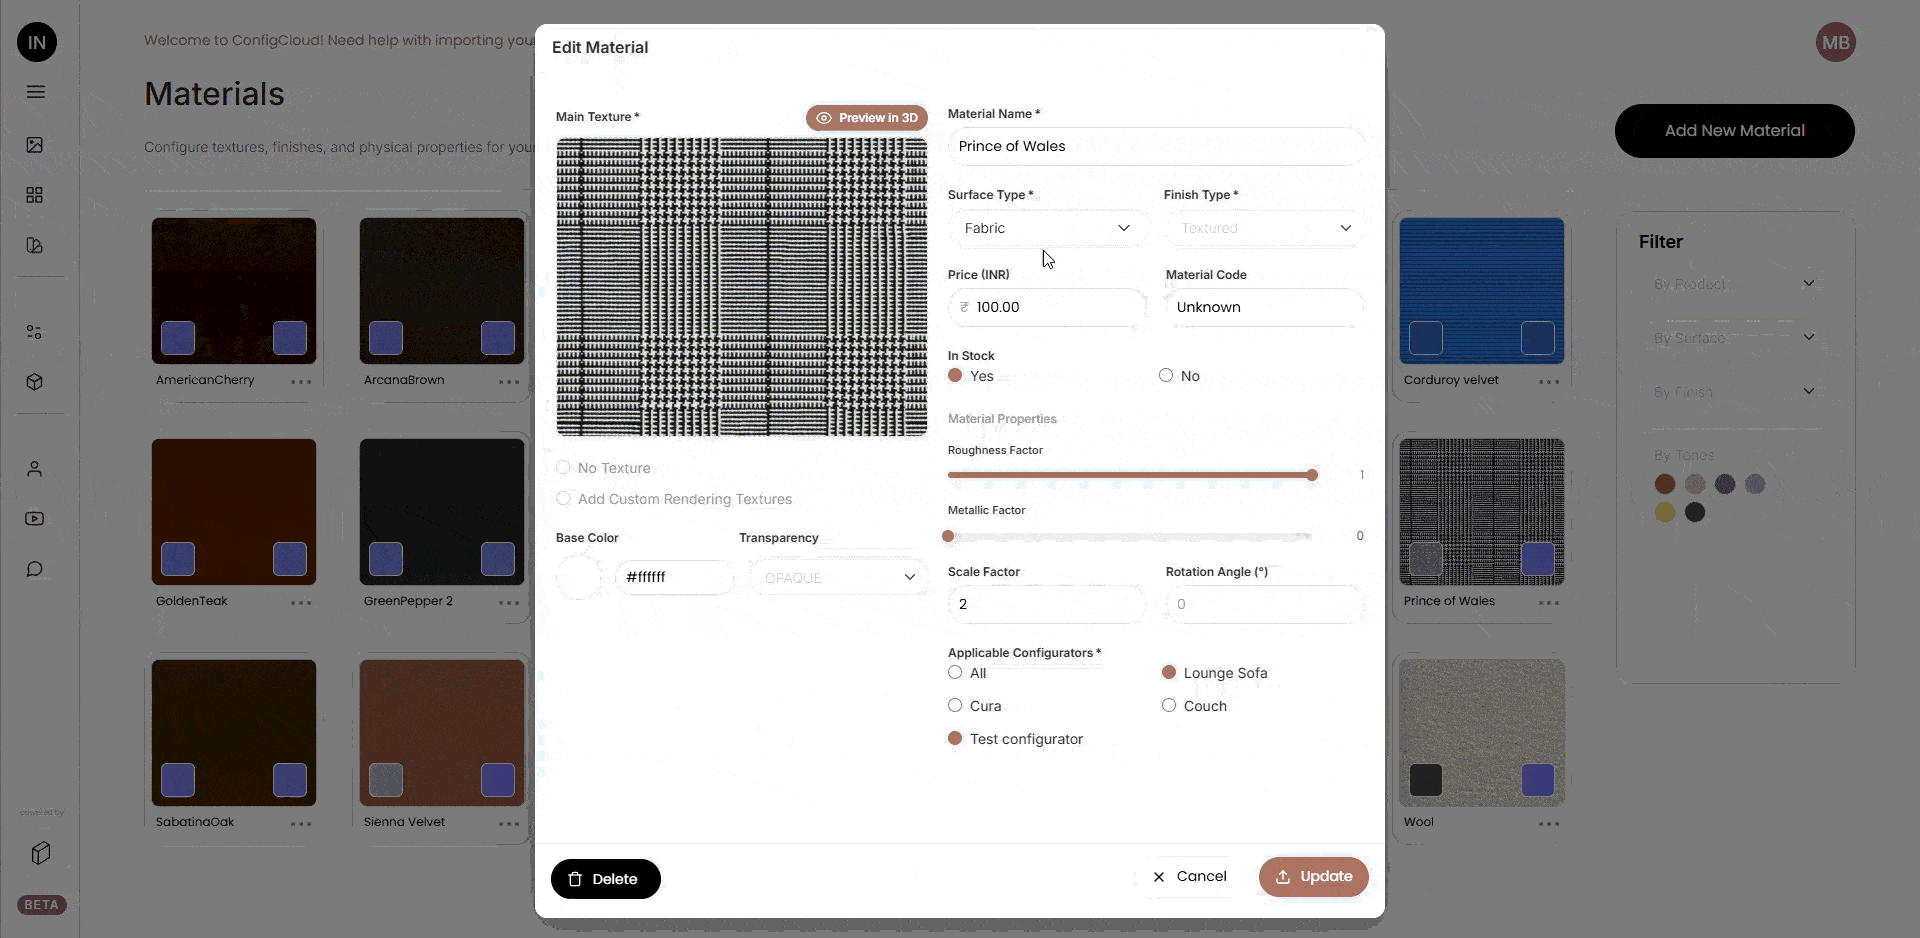
Edit a Material
To edit a material, click the three-dot menu (?) on any material card and select "Edit Material".

What You Can Edit
- Price
- Material Code
- Surface Type
- Finish Type
- Roughness Factor
- Metallic Factor
- Scale Factor
- Rotation Angle
- Base Color
- Transparency
- In Stock status
- Applicable Configurators
What Cannot Be Changed After Creation
- Textures (Main, Roughness, Normal): Once a material is saved, the texture images are permanently locked. If you need different textures, you will need to create a new material using the "Add New Material" button. If you hover over the texture areas in edit mode, a tooltip message will remind you of this.
- Texture Checkboxes: The "No Texture" and "Add Custom Rendering Textures" checkboxes are both fully disabled in edit mode. The texture approach chosen at creation cannot be changed.
How to Edit
When done, click Update to save your changes.
Duplicate a Material
Duplicating is useful when you want to create a similar material with slight differences, for example, the same wood texture in a different finish or color.
To duplicate, click the three-dot menu (?) on any material card and select "Duplicate Material".

How Textures Are Handled in Duplicate Mode
The original material's texture images are pre-loaded as previews so you can see what you are working with.
However, the actual texture files are not re-uploaded unless you make changes. If you save without touching the textures, the system reuses the original material's texture URLs directly.
Only if you upload new textures will new files be processed and stored.
All other properties, settings, and configurator assignments are copied from the original. You can change any field before saving.
How to Duplicate
 Click Duplicate to finish.
Delete a Material
How to Delete
Warning: deletion is permanent and cannot be undone. The following will be removed:
- The material record
- All texture files (main texture, roughness texture, normal texture)
- Any associated metadata
If the material is currently used in a configurator, removing it may affect how that configurator behaves for customers.
Material Properties
Basic Information
Material Name: The display name of your material. Must be unique across your library.
Material Code: An optional internal reference. You can use letters, numbers, or special characters.
Surface Type: Describes what kind of surface this material represents (Wood, Metal, Glass, Leather, Laminate, etc.). Multiple types can be selected. This is used for filtering and for matching materials to compatible objects in the configurator.
Finish Type: The type of finish applied to the surface (for example: Matte, Gloss, Satin).
In Stock: Controls visibility in the configurator. If set to No, the material will not appear to customers.
Price: The cost value displayed in the configurator. The currency shown next to the price field is based on your account settings — both the currency code and symbol are displayed together. Price changes affect all configurators this material is assigned to.

Texture Options and Validation Rules
Accepted File Types
Only JPG and PNG files are accepted for all texture uploads. No other formats will work.
File Size Limit
Each texture file must be 1MB or smaller. This applies to the main texture, roughness texture, and normal texture equally.
Image Dimension Limit
Images must be 1024×1024 pixels or smaller. If your image is larger than this in either dimension, the upload will be rejected.
Storage Limit
In addition to the per-file size limit, the system also checks your upload against your subscription's total storage allowance. If the file would push you over your total storage limit, it will not be accepted.
Main Texture
The primary visible image of your material. This is what customers see on the surface of objects in the configurator.
Roughness Texture
A grayscale image that controls how rough or smooth the surface looks under light. Brighter areas appear smoother, darker areas appear rougher.
Normal Texture
A special image that adds fine surface detail and depth to the material without changing the 3D geometry. This gives the impression of bumps, grooves, weave patterns, and so on.
Texture Checkbox Behavior
Below the main texture upload area, you will find two checkboxes. Understanding how they work will save you confusion.
1. No Texture
Check this if your material does not use a texture image. For example, a plain painted or solid-color surface. When checked, the system automatically loads a plain white image as the base, and you can then use the Base Color picker to set your desired color.
Checking "No Texture" also clears out any roughness and normal texture maps — these are not used for plain color materials.
2. Add Custom Rendering Textures
Check this if you want to upload your own roughness and normal texture maps manually instead of letting the system generate them. When this is checked, two additional small upload boxes appear for roughness and normal textures.
Important Rules for Both Checkboxes
- These two options are mutually exclusive; checking one automatically unchecks the other. You cannot have both active at the same time.
- Both checkboxes are completely disabled in Edit mode. The texture approach you choose when creating a material is permanent. If you need to change it, you will need to create a new material.
- If you uncheck "No Texture" after it was checked, and the plain white image was the only thing loaded, that image is automatically cleared from the upload area.
- If you toggle "Add Custom Rendering Textures" off after uploading your own roughness and normal maps, those custom uploads are discarded and the system regenerates the maps from your main texture automatically.
Auto-Generation of Rendering Textures
When you upload a main texture, the system can automatically generate roughness and normal maps for you. Here is exactly how it behaves depending on your checkbox selections:
No checkbox checked: After you upload a main texture, the system immediately generates both a roughness map and a normal map from it automatically. You do not need to do anything extra.
"Add Custom Rendering Textures" checked: The system still generates roughness and normal maps from your main texture as a starting default. However, the small upload boxes for these textures become active, and you can replace either or both of them by clicking the boxes and uploading your own files.
"No Texture" checked: No roughness or normal maps are generated or used. The material relies entirely on the plain white base and your chosen base color and property sliders.
This auto-generation means that for most materials, simply uploading one good main texture image is enough to get a realistic-looking result without needing to prepare additional map files.
Material Properties Panel
These settings control the physical behavior of your material under lighting in the 3D viewer and configurator.
Roughness Factor: A slider from 0 to 1. Lower values make the surface look shiny and reflective. Higher values make it look dull and matte.
Metallic Factor: A slider from 0 to 1. A value of 0 means the surface behaves like a non-metal (wood, fabric, plastic). A value of 1 means it behaves like a true metal with distinctly metallic reflections.
Scale Factor: Controls how large or small the texture appears when tiled across a surface. A higher number tiles the texture more times, making each individual tile smaller and the pattern appear finer.
Rotation Angle (°): Rotates the texture on the surface. Useful when a wood grain or directional pattern needs to run at a specific angle.
The system includes built-in default values for common surface types. When surface types like Laminate, Wood, Metal, Glass, or Leather are relevant, these defaults give you a sensible starting point for each property so you are not starting from scratch every time.
Color and Transparency Settings
Base Color: Click the colored circle to open the color picker. You can choose from a visual palette of preset colors or type a hex code directly into the input field (for example, #A0522D for a warm brown tone). The color you pick tints the texture on top, or when using "No Texture", it becomes the full surface color.
Transparency: Controls how the material handles see-through or translucent effects. There are three options:
- OPAQUE: The material is fully solid with no transparency. Use this for wood, metal, fabric, and most standard materials.
- BLEND: Allows semi-transparency, suitable for frosted glass, translucent plastic, or any material that lets some light through.
- ALPHA: Uses the texture image's own alpha channel to determine which parts are transparent. This is useful for materials with cut-out patterns or perforated surfaces.
3D Material Preview
While adding or editing a material, you will find a "Preview in 3D" button next to the Main Texture label at the top of the form.
Clicking this opens a 3D viewer that shows how your current material settings will look applied to a 3D model. The preview reflects your current texture uploads, base color, roughness, metallic factor, transparency, scale factor, and rotation settings in real time.
Controls in the 3D Viewer
- Drag to rotate the model and view it from any angle
- Scroll to zoom in and out
This helps check how your material reads on an actual 3D shape before saving, so you can spot issues with tiling, color, or reflectivity without having to open the full configurator.
Applicable Configurators
Every material must be assigned to at least one configurator before it can be saved.
In the "Applicable Configurators" section, you will see a list of all product configurators in your account. Check the ones where this material should appear.
You can check "All" to make the material available across every configurator at once.

If you later uncheck a configurator from a material that was previously available there, customers in that configurator will no longer be able to select it. Be mindful of this when editing existing materials.
Validation - What Is Checked Before Saving
When you click Save (or Update or Duplicate), the system checks five things at the same time before allowing the save to go through:
- Material Name: Must not be empty
- Main Texture: Must be uploaded (only applies in Add mode, and only when "No Texture" is not checked)
- Applicable Configurators: At least one must be selected
- Surface Type: At least one must be selected
- Finish Type: Must be selected
If any of these are missing, all failing fields are highlighted simultaneously and a message appears at the bottom of the form saying "Please fill in the mandatory fields." The form will not save until every required field is addressed.
Filtering and Organization
The filter panel on the right side of the Materials page helps you find specific materials quickly.
- By Product: Filter materials by which configurator they are assigned to.
- By Surface: Filter by surface type (Wood, Metal, Glass, etc.).
- By Finish: Filter by finish type.
- By Tones: Filter by general color family using the colored dot buttons. Click a dot to activate that tone filter. Click the same dot again to clear it.

All filters can be used together. The grid will show only materials that match every selected filter at the same time. To clear all filters, reset the dropdowns back to their default options and make sure no tone dot is selected.
Grid Sorting Behavior
The materials grid follows a specific sort order that is worth knowing, especially when you have a large library:
Enabled materials always appear before disabled ones. All active materials are grouped at the top of the grid, and all disabled materials appear after them.
Within each group, materials are sorted alphabetically by name. This means the name you give a material affects where it appears in the grid. If you want a material to appear near the top of your active list, give it a name that starts with a letter early in the alphabet.
This sorting applies to the filtered view as well — whatever materials remain after filtering are still sorted in this same order.
Subscription Limits
Your subscription plan determines the maximum number of materials you can have active at one time.
Materials are sorted alphabetically, and those that fall within your plan's limit are active and fully usable. Any materials beyond that limit are shown as greyed-out disabled cards in the grid.
When you try to click a disabled card or click "Add New Material" after reaching your limit, a popup will appear letting you know the limit has been reached and prompting you to upgrade your plan.
Disabled materials remain in your library and are still visible, but they cannot be edited or used in configurators until you either upgrade your plan or free up space by deleting other materials.
Need Help?
If you run into any issues or have questions not covered in this guide, please reach out to the support team.